
LED Flashing Circuit Using Transistor
LED FLASHING CIRCUIT USING TRANSISITOR
AIM:
Design and setup a LED flashing circuit using transistor.
MATERIALS AND TOOLS REQUIRED:
Solder, flux, knife/blade, soldering iron, desoldering pump and nose pliers.
THEORY:
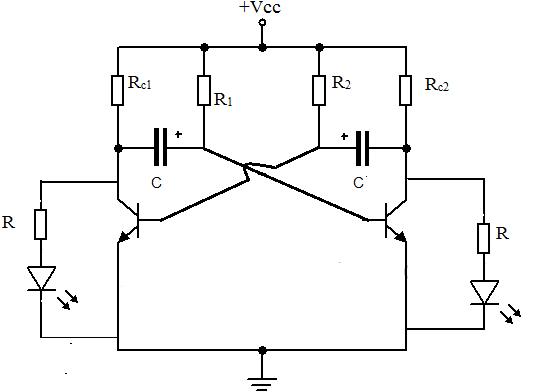
An Astable Multi-vibrator or a free running oscillator circuit is generally used to generate square waves for a specified time period. The name Astable Multi-vibrator is used for it because, it does not have a stable state and it switches between two quasi stable states. Consider the instant at which the DC supply is switched on. The collector terminal of T1 is connected to the base of T2 via a capacitor C1 and similarly the collector terminal of T2 is connected to the base of transistor T1. So, due to this configuration only one transistor can remain switched-on at a time. The time period is determined by the capacitor connected to its base. At the time of providing supply to this circuit, any imbalance among the transistors can cause any one of the transistor to conduct more, let it be T1 now. As T1 turns on its collector potential will be VCEsat which is approximately equal to 0.3v therefore the transistor T2 will get a base potential less than the cutin voltage 0.7 and this prevents transistor T2 from turning on. Now since the capacitor C1 is connected in series with the base terminal of T2, the capacitor charges to vcc through RC1 resistor. As the capacitor charges, the base voltage of T1 increases exponentially and when it is more than 0.7 v, the T2 turns on. But the collector voltage of T2 drops to VCEsat which in turn is connected to the base of T1 and it drives T1 to switched-off state. Now C2 charges to vcc through Rc2 resistor and when the base voltage of T1 is more than 0.7v T1 turns on and T2 goes off . This regenerative action continues until the power supply is maintained. Thus the time period depends on the value of C1 and C2.
Circuit Diagram:
PROCEDURE
- The circuit is wired as in the circuit diagram
- Connect the supply voltage.
- The LED flashes.
- Verify the time period.


Recent Comments